How to move items around
This section was prompted by the following question:
"I have created a chart made from small designs and words, but
now I need to move them about: how can I do that?"
Like most things in the software, there are several ways you can go about this kind of job.
Firstly, if there is space around the shapes you want to move:
The area you select can be a rectangle, or a freehand shape (the lasso tool), shown here:
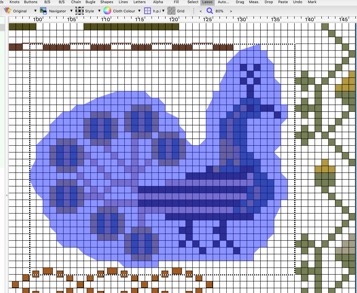
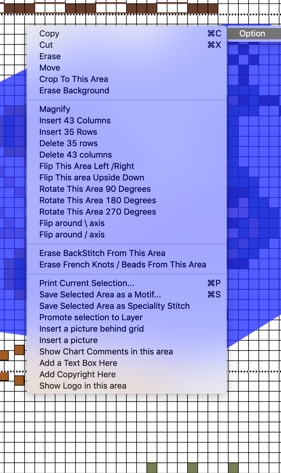
When you release the mouse after drawing freehand around the shape, a menu will pop up , saying 'Options'
From that, you can choose to CUT the shape:
Once the shape has been cut, it will disappear from the screen, leaving an empty hole.
Now, you can move to another part of the design using the scroll bars around the grid, or using the Navigator window, even if only by a square or two.
Once you can see the area you want to place the cut piece ('motif'), you can choose Edit/Paste from the menus, or press CMD-V (mac) or CTRL_V (PC) to paste the motif.
The cut shape will move around under the control of the mouse.
When it is in the right place, click once to place it.
What if that was a mistake?
Choose Edit/Undo (or CMD-Z or CTRL-Z) to undo.
Moving things around again:
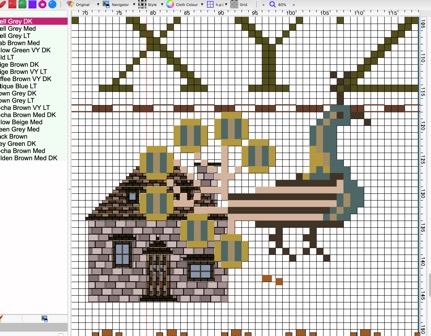
In the above example, we pasted the bird down, but once it has been pasted it is a permanent part of the design.
We can no longer early draw a selector around the grid, because it is surrounded by parts of the house.
If there is a need to place items, and move them about repeatedly until they are in the right place, that's where we need to use 'Layers'
To use a Layer:
In the example above, when we chose Edit/Paste (CMD-V, CTRL-V) , it pasted straight into the chart.
Instead, at that stage, use Edit/Paste as a Layer (CMD-L or CTRL-L)
This inserts the cut piece (motif) as a moveable layer, with a red rectangle around it.
At the same time, a row is added to the Leyers List on the left of the screen, as below:
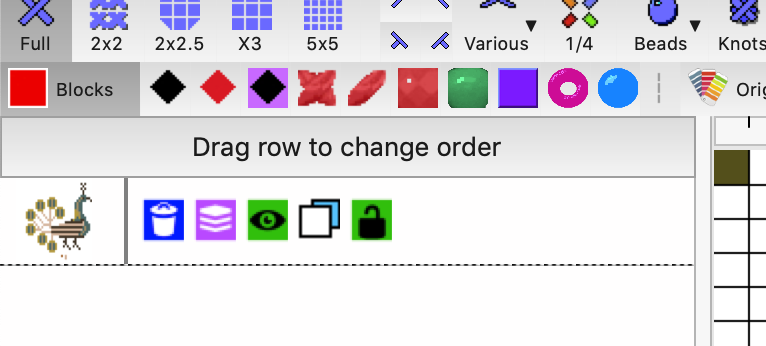
Each pasted layer appears in this list.
The one on the top appears in front of any others that occupy the same space.
You can drag layers up or down this list to re-order them, if you want to place then forward or backwards
The small icons next to the thumbnail view of the layer are used (left to right) to:
Here, we can see the layer on a blank background, next to a rectangle of red stitches.
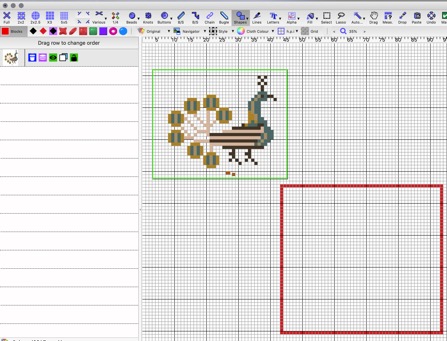
Clicking on the layer in the list on the left, makes the layer display with a green rectangle around it.
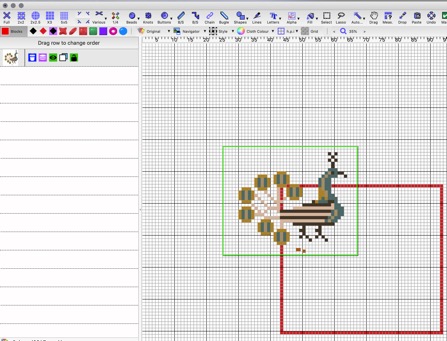
While that is selected, it can be dragged around using the left mouse button.
Here we have moved it a little to the right.
It is still not a permanent part of the design. However, it will be printed or exported to PDF as if it is , if you do that at this stage.
When you save the chart, layers remain as layers and can be moved next time you open the chart.
Finally, we drag the bird into the red rectangle area.
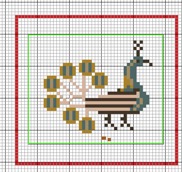
If we never need to move that again, you can click the 'flatten' icon in the layer list and it becomes permanent / no longer a layer.
Video:
This section was prompted by the following question:
"I have created a chart made from small designs and words, but
now I need to move them about: how can I do that?"
Like most things in the software, there are several ways you can go about this kind of job.
Firstly, if there is space around the shapes you want to move:
- Select an area
- Cut
- Paste
The area you select can be a rectangle, or a freehand shape (the lasso tool), shown here:
When you release the mouse after drawing freehand around the shape, a menu will pop up , saying 'Options'
From that, you can choose to CUT the shape:
Once the shape has been cut, it will disappear from the screen, leaving an empty hole.
Now, you can move to another part of the design using the scroll bars around the grid, or using the Navigator window, even if only by a square or two.
Once you can see the area you want to place the cut piece ('motif'), you can choose Edit/Paste from the menus, or press CMD-V (mac) or CTRL_V (PC) to paste the motif.
The cut shape will move around under the control of the mouse.
When it is in the right place, click once to place it.
What if that was a mistake?
Choose Edit/Undo (or CMD-Z or CTRL-Z) to undo.
Moving things around again:
In the above example, we pasted the bird down, but once it has been pasted it is a permanent part of the design.
We can no longer early draw a selector around the grid, because it is surrounded by parts of the house.
If there is a need to place items, and move them about repeatedly until they are in the right place, that's where we need to use 'Layers'
To use a Layer:
In the example above, when we chose Edit/Paste (CMD-V, CTRL-V) , it pasted straight into the chart.
Instead, at that stage, use Edit/Paste as a Layer (CMD-L or CTRL-L)
This inserts the cut piece (motif) as a moveable layer, with a red rectangle around it.
At the same time, a row is added to the Leyers List on the left of the screen, as below:
Each pasted layer appears in this list.
The one on the top appears in front of any others that occupy the same space.
You can drag layers up or down this list to re-order them, if you want to place then forward or backwards
The small icons next to the thumbnail view of the layer are used (left to right) to:
- Delete this layer
- Turn the layer into a permanent part of the design
- Make the layer visible or not on screen
- Affect how transparent the layer is .
- Lock the position so that it can not be accidentally moved
Here, we can see the layer on a blank background, next to a rectangle of red stitches.
Clicking on the layer in the list on the left, makes the layer display with a green rectangle around it.
While that is selected, it can be dragged around using the left mouse button.
Here we have moved it a little to the right.
It is still not a permanent part of the design. However, it will be printed or exported to PDF as if it is , if you do that at this stage.
When you save the chart, layers remain as layers and can be moved next time you open the chart.
Finally, we drag the bird into the red rectangle area.
If we never need to move that again, you can click the 'flatten' icon in the layer list and it becomes permanent / no longer a layer.
Video: