How to create a Graphghan
Note, over time, new features are introduced into our software regularly and some screen layouts change.
Everything discussed below is still valid, although some screen layouts will now vary.
What is a graphghan?
Simply put, a graphghan is a crochet work ‘afghan’, which uses the same kind techniques as a cross stitch pattern to create an image: either some simple design like a logo or wording, or less commonly to create an image like a photograph.
Can’t I just use a Cross Stitch Pattern?
You can. Many people do. But one problem with that is that the shape of a crochet stitch is taller than a cross stitch one.
Using a cross stitch pattern will give you a ‘too tall’ effect when stitched’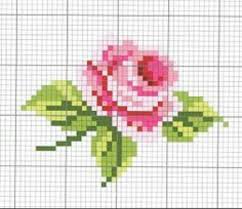 Stitches like this:
Our software will handle that for you, by widening the chart or removing rows to keep things the right shape.
Do I have to count all the stitches in a row?
No: thats where our ‘Output to Tunisian Crochet’ menu comes into things.
If you prefer the style of chart that tells you to stitch 5 green , then 2 red, then 4 yellow, we can do that for you.
No more counting symbols.. just follow the simple chart.
It can give you L/R alternating instructions, or always left-to-right
Here are the first few rows of a black heart on a white background, using alternating L/R then R/L counting:
Row 001 (R to L) :{black} x50,END
Row 002 (L to R) :{black} x1, {white} x48, {black} x1,END
Row 003 (R to L) :{black} x2, {white} x48, {black} x1,END
Row 004 (L to R) :{black} x1, {white} x48, {black} x2,END
Row 005 (R to L) :{black} x2, {white} x48, {black} x1,END
Row 006 (L to R) :{black} x1, {white} x11, {black} x10, {white} x6, {black} x10, {white} x11, {black} x2,END
Row 007 (R to L) :{black} x2, {white} x9, {black} x14, {white} x2, {black} x14, {white} x9, {black} x1,END
Row 008 (L to R) :{black} x1, {white} x8, {black} x32, {white} x8, {black} x2,END
Row 009 (R to L) :{black} x2, {white} x6, {black} x36, {white} x6, {black} x1,END
Row 010 (L to R) :{black} x1, {white} x5, {black} x38, {white} x5, {black} x2,END
How do I create a chart using a piece of clipart?
Ideally, get a picture which is the same size in pixels as the width of the piece you want to sew.
(The program can reduce a big image down to size if you want, but for this HowTo, we will assume the image is already the right size.)
1: Find your image. We will use this one:
![]()
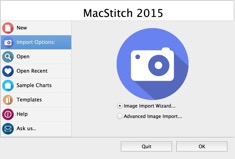
2: Start MacStitch or Winstitch
3: Choose Import Options
4: Browse for the image: note that the size shows 32 x 32 .. our original size..
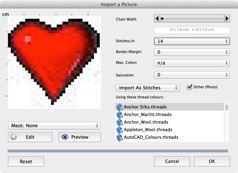
4: Untick the ‘dither’ box: (we want to keep the design as simple as possible)
5: Select a Palette from the colour list. (These have only a handful of colours.. keeps it simple..)
(Note you can save your own palettes with perhaps only 5 colours in them if you like)

6: Click OK.
Note that we have some unwanted colours. (If we had used a palette containing only black, red, brown and white, there wouldn’t be any)
Also our palette was formed of DMC colours, but could have been any manufacturer.
(You can rename any of these colours by right clicking on the palette row and choosing ‘Edit Current Thread’ from the menus)
7: Open the Palette Menu : Search and Replace
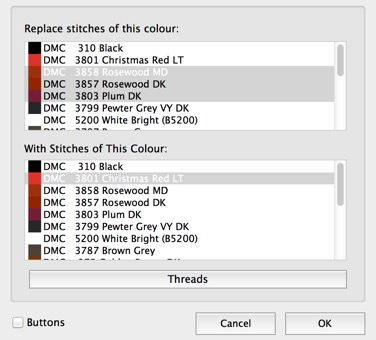
Select a bunch of Red colours, and replace them with a single red colour.
Do the same with the off-white colours
Do the same with the ‘near black’ colours
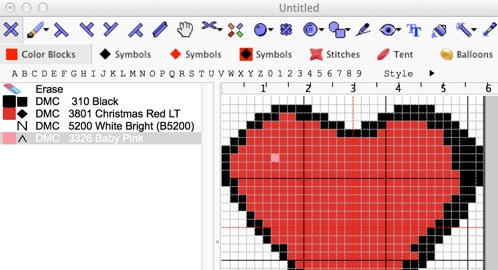
8: Then use the Palette Menu: Remove all Unused Threads from the Palette.
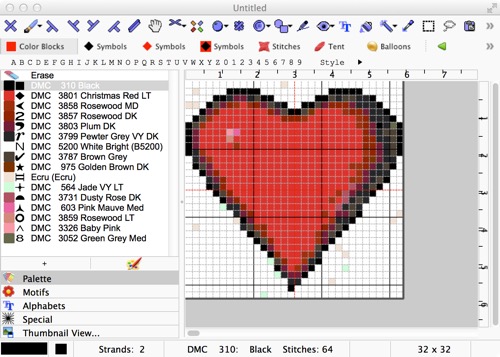
9: Now you have a much simpler pattern
10: You could print this as a cross stitch style pattern now. But for a graphgan, you would end up with a much taller heart.
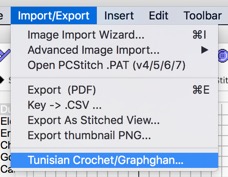
So the final stage is to use the Import/Export menu option : Output as Tunisian Crochet.
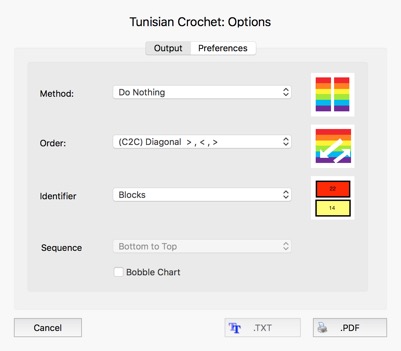
There is a ‘Method’ option here, and it is used to determine how we cope with the fact that crochet stitches are taller.
(see rose image at the top of the page)
Method option:
‘Do Nothing’ means what it says.. you get every stitch of the chart as a crochet stitch.
But you could get a more accurate shape if you omit the odd row here and there.
So if you have an actual circle of a chart, you need to omit 1 in every 3 or so rows to make the crochet be a circle when completed.
To do that, choose ‘Remove Rows’ from the method drop down list.
If you want to keep the rows, then you can add some width instead: choose ‘Increase width’ to do that.
Order option:
There are dozens of ways people want to produce charts for crochet.
The order option lets you choose between left to right, right to left, alternating, corner to corner etc.
For this example, choose Right to Left alternating.
Having made that choice, click the TXT button
This is the result after choosing ‘Remove Rows’
Note there are fewer rows than 32. When sewn, the heart will still be the same shape as the original.Row 001 (R to L) :{White} x32,ENDRow 002 (L to R) :{White} x6, {Black} x5, {White} x10, {Black} x5, {White} x6,ENDRow 003 (R to L) :{White} x4, {Black} x9, {White} x6, {Black} x4, {Red} x2, {Black} x3, {White} x4,ENDRow 004 (L to R) :{White} x2, {Black} x1, {Red} x11, {Black} x5, {Red} x8, {Black} x3, {White} x2,ENDRow 005 (R to L) :{White} x1, {Black} x4, {Red} x24, {Black} x2, {White} x1,ENDRow 006 (L to R) :{Black} x1, {Red} x5, {Pink} x1, {Red} x21, {Black} x4,ENDRow 007 (R to L) :{Black} x4, {Red} x27, {Black} x1,ENDRow 008 (L to R) :{Black} x1, {Red} x28, {Black} x3,ENDRow 009 (R to L) :{White} x1, {Black} x2, {Red} x27, {Black} x1, {White} x1,ENDRow 010 (L to R) :{White} x1, {Black} x2, {Red} x25, {Black} x3, {White} x1,ENDRow 011 (R to L) :{White} x2, {Black} x3, {Red} x23, {Black} x1, {White} x3,ENDRow 012 (L to R) :{White} x3, {Black} x2, {Red} x21, {Black} x3, {White} x3,ENDRow 013 (R to L) :{White} x4, {Black} x3, {Red} x19, {Black} x2, {White} x4,ENDRow 014 (L to R) :{White} x6, {Black} x2, {Red} x15, {Black} x3, {White} x6,ENDRow 015 (R to L) :{White} x6, {Black} x2, {Red} x16, {Black} x1, {White} x7,ENDRow 016 (L to R) :{White} x8, {Black} x2, {Red} x12, {Black} x2, {White} x8,ENDRow 017 (R to L) :{White} x9, {Black} x2, {Red} x10, {Black} x2, {White} x9,ENDRow 018 (L to R) :{White} x10, {Black} x2, {Red} x9, {Black} x1, {White} x10,ENDRow 019 (R to L) :{White} x12, {Black} x1, {Red} x6, {Black} x1, {White} x12,ENDRow 020 (L to R) :{White} x13, {Black} x1, {Red} x4, {Black} x2, {White} x12,ENDRow 021 (R to L) :{White} x14, {Black} x1, {Red} x2, {Black} x1, {White} x14,END
What else?
You can also produce color block output like this:
or this:
Just choose ‘Color Blocks’ as the output style.
(This can only be output as a PDF file)